
Christmas is coming ! Let's spice up your Christmas day with creating
your own Christmas card. In this tutorial you will learn how to design a
Christmas Card with CorelDraw. You will learn to create a Christmas
tree, 3d text effect, bursting stars and a beautiful background.


This also will be our steps to create the design.


After that break the font by pressing " Ctrl + A + B ", select the " C " text, go to the top toolbar, and find " Effect > Add Perspective ", now you will see that there is a frame in the " C " shape it similar like below.

Using same steps as above apply it to the next text which is " H ".

Now apply it to all the text.

After that select the " C " text and go the " Interactive Contour Tool " in the left toolbar, apply the value below to create similar works.

Okay now break the contour by pressing " Ctrl + K ", after that select the contour and go to the " Extrude Tool " in the left toolbar, drag the " X " marks to the left side to create similar extrusion.

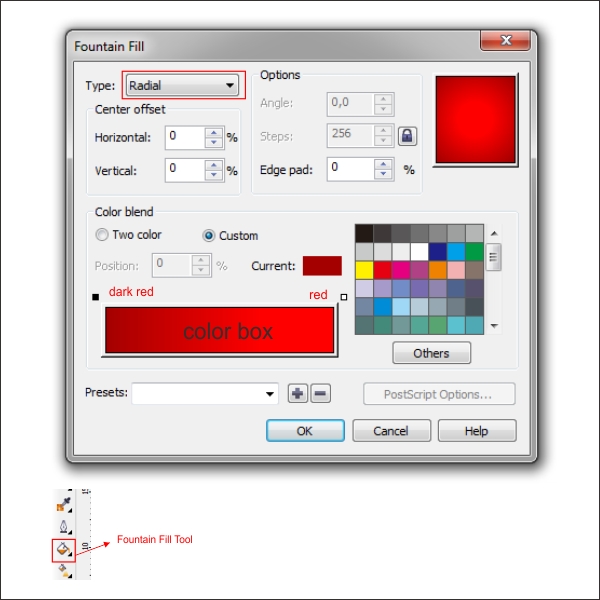
After that lets put color in it, go to the " Fountain Fill Tool " and apply the value below.


Now apply the steps above on all the text.

Go to the "Star Tool " and create a star shape similar like below.

After that lets create a contour or outline for the star by go to the " Contour Tool " and apply the value below, you can use any color that you like, in this case i use pink.

Now break the contour by pressing " Ctrl + K " and go to the " Extrude Tool " in the left toolbar, drag the " X " marks to the right side to create similar extrusion.

Go to the upper toolbar and set the Extrusion color into pink and purple or any color that you like.

Using same steps as above create as many bursting star as you like, make the color different from the original to make it more colorful.

After that group all the stars by pressing " Ctrl + G ", and arrange it on the side of the 3D Text.


Create several circle shape untill it looks like a cloud.

Now select all the circle, go to the upper toolbar and find " Weld tool " press it on order to weld all the objects.

After that create two more circle on top of the cloud shape, similar like below.

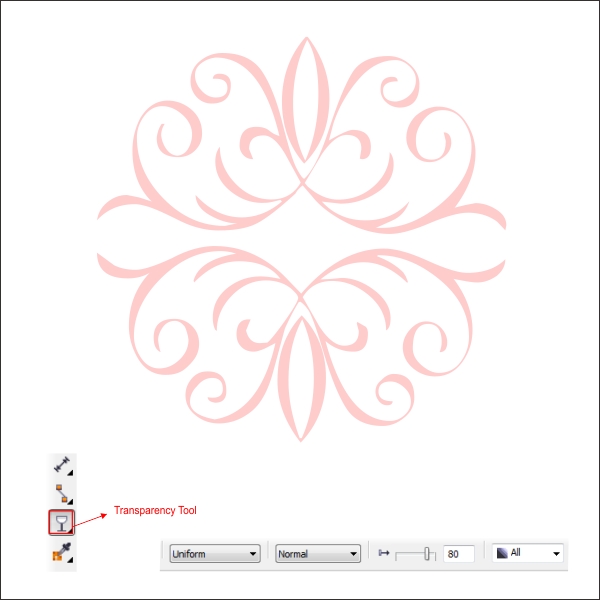
Put white color on the two circle and go to the " Transparency Tool " in the left toolbar, drag the glass cursor to the bottom to create similar transparencies.

Select the circle, go to the top toolbar and find Effect > PowerClip > Place inside container, click it to the cloud to insert the circle.


After that copy and arrange the cloud similar like below to create the Cloudy Backgrounds.

Group all the clouds by pressing " Ctrl + G ", and arrange it on the bottom of the 3D text and Bursting stars.


After that go to the " Shape Tool " click on the right and left middle side of the triangle and press " Convert to curves " on the upper toolbar, now you see that there is an arrow on the corner, drag it on order to shape it similar like below.

Now double click & drag on the left bottom corner of the triangle to create a curve shape.

Using same steps create a similar curvy shape on the bottom, untill the triangle looks like a Pine Tree.

Now lets put color in it, go to the " Fountain Fill tool " and apply the value below to create similar colors.


After that make 2 copy of the pine tree by pressing " Left + Right mouse " while dragging it, arrange the copied objects into top and bottom of the pine tree.

Now select the bottom copied pine tree and put color in it by go to the " Fountain Fill Tool " and apply the value below.


After that select the upper copied pine tree, put green color in it, after that go to the " Transparency Tool " and drag the glass cursor from bottom to top to create similar transparencies.

Now place the upper copied pine tree inside the original pine tree using " PowerClip ", go to the top toolbar and find Effect > PowerClip > Place inside container, click it to the pine tree to insert it.


Okay now we are going to create a glossy detail for the pine tree, go to the " Bezier Tool " and create a custom shape similar like below, put a light yellow color in it.

Shape it using shape tool, to blend the custom shape with the pine tree.

Now make it transparent, by go to the " Transparency Tool " and drag the glass cursor from bottom to top to create similar transparencies.

After that place the transparent shape inside the pine tree using " PowerClip " same as steps before.

Using the same technique as above, create as many glossy effects on the pine tree as you like.

Now select all the pine tree and group it by pressing " Ctrl + G ", after that copy the pine tree by pressing " Left + Right mouse " while dragging it, make the copied pine tree bigger than the original and arrange it on the bottom.

Using the same steps as above copy again the pine tree and arrange it to the bottom.

Okay now we are going to create the golden ribbon, go to the " Bezier Tool " and create a custom shape on top of the pine tree similar like below.

Shape it using " Shape Tool " untill it looks like a ribbon that wrap around the pine tree.

Okay now lets put color in it by go to the " Fountain Fill Tool " and apply the value below.


Using the same technique as above, create another golden ribbon, untill its completely wrap the pine tree similar like below.

Now create a star shape using " Star Tool " in the left toolbar.
Copy the star by pressing " Left + Right mouse " while dragging it to the middle.

Put Dark yellow on the bigger star and white color on the little star.

Arrange it on top the pine tree.

After that create a thin needle - like shape using " Bezier Tool ", similar like below.

Copy and rotate the needle shape by pressing " Left + Right mouse " while rotating it.

Now select both of the needle and group it by pressing " Ctrl + G " after that rotate and copy it again, but this time make the copied object smaller.

This will be our star sparkle, put white color and arrange it on top of the yellow star on the christmas tree.

Okay now group it by selecting all the object and press " Ctrl + G ", after that arrange it on top corner of the 3D Text group.


Lets put color in it by go to the " Fountain Fill Tool " and apply the value below.

Now I need you to download the card texture in the Source Page above, after you download it import it to our worksheet by pressing " Ctrl + I ".

Cool, now select the texture, put red color in it and go to the " Transparency Tool " in the left toolbar, apply the value below to create similar transparencies.
Now arrange the texture on top of the card frame and place it inside the card frame using " PowerClip ".


Now arrange the card frame on the bottom of the 3d Text groups.

Create three box shape using " Rectangle Tool " and arrange it on the bottom corner of the card frame similar like below.

Now shape the box using " Shape Tool ".

Put color on the Ribbon, go to the " Fountain Fill Tool ", and apply the value below.

After that rotate and copy the ribbon, and put it on the top corner of the card frame.

Put it inside the card frame using " PowerClip ".

Final Image Preview
Tutorial Details
- Program: CorelDraw 11 - X5
- Difficulty: All
- Estimated Completion Time: 1 Hour
Tutorial Assets
The following assets were used during the production of this tutorial.Step 1 : Basic Elements
First of all you have to use CorelDraw with version 11+. In this tutorial I use CorelDraw X5, Okay lets get started. Let’s take a look at the basic elements used to create our design :This also will be our steps to create the design.
Step 2 : Creating Worksheet
Okay, now that you know the steps and elements, we will begin, first of all open your CorelDraw program, now create a new file and set the paper size to A4.Step 3 : Creating The 3D Text
Now that we have our worksheet set, we will begin to create the 3D Text, go to the " Text Tool " in the left toolbar, select the " AderaDisplay " Font type which you can download in the source page, and type " Christmas ", similar like below.After that break the font by pressing " Ctrl + A + B ", select the " C " text, go to the top toolbar, and find " Effect > Add Perspective ", now you will see that there is a frame in the " C " shape it similar like below.
Using same steps as above apply it to the next text which is " H ".
Now apply it to all the text.
After that select the " C " text and go the " Interactive Contour Tool " in the left toolbar, apply the value below to create similar works.
Okay now break the contour by pressing " Ctrl + K ", after that select the contour and go to the " Extrude Tool " in the left toolbar, drag the " X " marks to the left side to create similar extrusion.
After that lets put color in it, go to the " Fountain Fill Tool " and apply the value below.
Now apply the steps above on all the text.
Step 4 : Creating The Bursting Star
Now that we have our 3D Text ready, lets begin to create the Bursting Star, first we will start to create an Eyes.Go to the "Star Tool " and create a star shape similar like below.
After that lets create a contour or outline for the star by go to the " Contour Tool " and apply the value below, you can use any color that you like, in this case i use pink.
Now break the contour by pressing " Ctrl + K " and go to the " Extrude Tool " in the left toolbar, drag the " X " marks to the right side to create similar extrusion.
Go to the upper toolbar and set the Extrusion color into pink and purple or any color that you like.
Using same steps as above create as many bursting star as you like, make the color different from the original to make it more colorful.
After that group all the stars by pressing " Ctrl + G ", and arrange it on the side of the 3D Text.
Step 5 : Creating The Cloudy Background
Now lets create the Cloudy background, go to the " Ellipse Tool " in the left toolbar and create a circle shape.Create several circle shape untill it looks like a cloud.
Now select all the circle, go to the upper toolbar and find " Weld tool " press it on order to weld all the objects.
After that create two more circle on top of the cloud shape, similar like below.
Put white color on the two circle and go to the " Transparency Tool " in the left toolbar, drag the glass cursor to the bottom to create similar transparencies.
Select the circle, go to the top toolbar and find Effect > PowerClip > Place inside container, click it to the cloud to insert the circle.
After that copy and arrange the cloud similar like below to create the Cloudy Backgrounds.
Group all the clouds by pressing " Ctrl + G ", and arrange it on the bottom of the 3D text and Bursting stars.
Step 6 : Creating The Christmas Tree
Okay now lets Create the Christmas Tree, first go to the " Polygonal Tool " and create a triangle shape by applying the point or sides into 3 and drag it to the worksheet.After that go to the " Shape Tool " click on the right and left middle side of the triangle and press " Convert to curves " on the upper toolbar, now you see that there is an arrow on the corner, drag it on order to shape it similar like below.
Now double click & drag on the left bottom corner of the triangle to create a curve shape.
Using same steps create a similar curvy shape on the bottom, untill the triangle looks like a Pine Tree.
Now lets put color in it, go to the " Fountain Fill tool " and apply the value below to create similar colors.
After that make 2 copy of the pine tree by pressing " Left + Right mouse " while dragging it, arrange the copied objects into top and bottom of the pine tree.
Now select the bottom copied pine tree and put color in it by go to the " Fountain Fill Tool " and apply the value below.
After that select the upper copied pine tree, put green color in it, after that go to the " Transparency Tool " and drag the glass cursor from bottom to top to create similar transparencies.
Now place the upper copied pine tree inside the original pine tree using " PowerClip ", go to the top toolbar and find Effect > PowerClip > Place inside container, click it to the pine tree to insert it.
Okay now we are going to create a glossy detail for the pine tree, go to the " Bezier Tool " and create a custom shape similar like below, put a light yellow color in it.
Shape it using shape tool, to blend the custom shape with the pine tree.
Now make it transparent, by go to the " Transparency Tool " and drag the glass cursor from bottom to top to create similar transparencies.
After that place the transparent shape inside the pine tree using " PowerClip " same as steps before.
Using the same technique as above, create as many glossy effects on the pine tree as you like.
Now select all the pine tree and group it by pressing " Ctrl + G ", after that copy the pine tree by pressing " Left + Right mouse " while dragging it, make the copied pine tree bigger than the original and arrange it on the bottom.
Using the same steps as above copy again the pine tree and arrange it to the bottom.
Okay now we are going to create the golden ribbon, go to the " Bezier Tool " and create a custom shape on top of the pine tree similar like below.
Shape it using " Shape Tool " untill it looks like a ribbon that wrap around the pine tree.
Okay now lets put color in it by go to the " Fountain Fill Tool " and apply the value below.
Using the same technique as above, create another golden ribbon, untill its completely wrap the pine tree similar like below.
Now create a star shape using " Star Tool " in the left toolbar.
Copy the star by pressing " Left + Right mouse " while dragging it to the middle.
Put Dark yellow on the bigger star and white color on the little star.
Arrange it on top the pine tree.
After that create a thin needle - like shape using " Bezier Tool ", similar like below.
Copy and rotate the needle shape by pressing " Left + Right mouse " while rotating it.
Now select both of the needle and group it by pressing " Ctrl + G " after that rotate and copy it again, but this time make the copied object smaller.
This will be our star sparkle, put white color and arrange it on top of the yellow star on the christmas tree.
Okay now group it by selecting all the object and press " Ctrl + G ", after that arrange it on top corner of the 3D Text group.
Step 7 : Creating The Card Frame
Now our Christmas card is almost ready, lets create the Card Frame, go to the " Rectangle Tool " create a box shape and resized it to " 15,24 x 15,x24 cm " which is standard postcard size.Lets put color in it by go to the " Fountain Fill Tool " and apply the value below.
Now I need you to download the card texture in the Source Page above, after you download it import it to our worksheet by pressing " Ctrl + I ".
Cool, now select the texture, put red color in it and go to the " Transparency Tool " in the left toolbar, apply the value below to create similar transparencies.
Now arrange the texture on top of the card frame and place it inside the card frame using " PowerClip ".
Now arrange the card frame on the bottom of the 3d Text groups.
Create three box shape using " Rectangle Tool " and arrange it on the bottom corner of the card frame similar like below.
Now shape the box using " Shape Tool ".
Put color on the Ribbon, go to the " Fountain Fill Tool ", and apply the value below.
After that rotate and copy the ribbon, and put it on the top corner of the card frame.
Put it inside the card frame using " PowerClip ".


I'm gone to inform my little brother, that he should also pay a quick
ReplyDeletevisit this web site on regular basis to get updated from most up-to-date information.